
Creating a home theater setup is an exciting project, but even the best projector can deliver poor results if it is not positioned correctly. Many people spend hours researching specifications, brightness levels, and screen types yet overlook one crucial factor — placement. Proper projector placement determines whether you enjoy a crisp, cinematic picture or end up with distorted, dim visuals. XTEN-AV brings you this detailed guide to help you identify and avoid common Projector Placement Mistakes that can ruin image quality and overall viewing experience.
Why Projector Placement Matters
A projector’s position in your room affects several key aspects of image performance, including focus, brightness, geometry, and color consistency. If the projector is not aligned correctly, even the most advanced models will struggle to deliver a sharp image. Poor placement also causes unnecessary eye strain, uneven lighting, and distracting distortions that take away from your viewing pleasure.
When setting up your home theater, it is essential to plan ahead. Consider the size of your room, the distance from the screen, ceiling height, and furniture arrangement before finalizing where to mount or place your projector. A few inches off can make a big difference in image quality.
Mistake 1: Placing the Projector Too Close or Too Far from the Screen
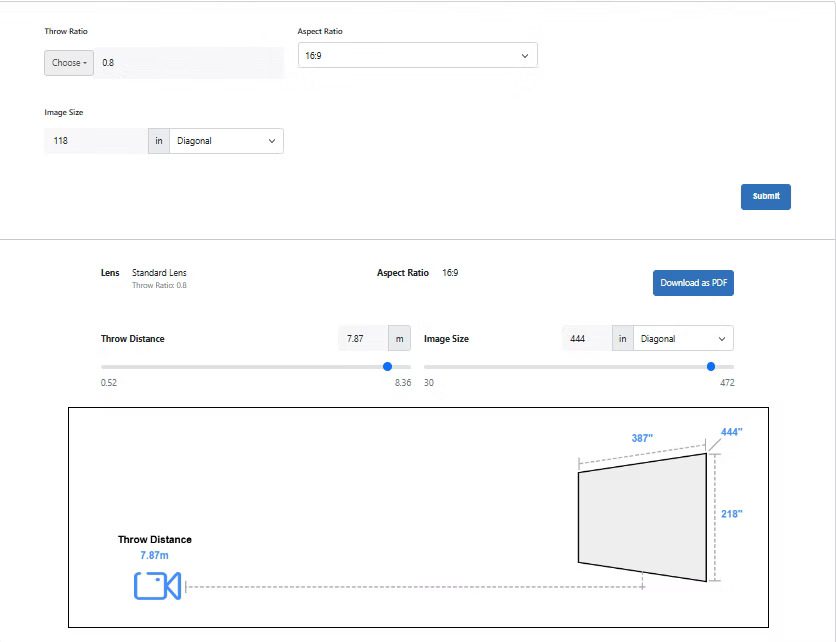
One of the most common Projector Placement Mistakes is incorrect throw distance. Every projector has a specific throw ratio, which determines how far it should be placed from the screen to produce the ideal image size.
-
Too close: Placing the projector too close will result in a smaller, brighter image that may appear pixelated or distorted.
-
Too far: Setting it too far back causes the image to become dim and lose clarity.
Always check your projector’s manual for the recommended throw distance. Use this information to calculate the correct placement based on your desired screen size. Measuring before mounting saves you from frustration and unnecessary repositioning later.
Mistake 2: Incorrect Height or Angle Alignment
Another frequent mistake is mounting or positioning the projector at the wrong height or angle. When the lens is not aligned properly with the center of the screen, the image can appear slanted or trapezoidal. This issue is known as keystone distortion.
While most modern projectors have digital keystone correction, overusing it reduces image quality and sharpness. Instead, focus on getting the physical alignment right.
-
The projector lens should be horizontally centered with the screen.
-
The height of the projector should either be level with the top or bottom edge of the screen, depending on whether it is ceiling-mounted or placed on a table.
-
Avoid tilting the projector up or down unless absolutely necessary.
Taking a few extra minutes to adjust the alignment ensures perfect geometry and better overall visuals.
Mistake 3: Ignoring Room Lighting Conditions
Lighting plays a huge role in how your projected image looks. Bright rooms can wash out colors and reduce contrast, even with high-lumen projectors. Many users make the mistake of setting up their projector without controlling ambient light.
Here is how to fix it:
-
Use blackout curtains or blinds to block sunlight.
-
Choose a darker wall color or install light-absorbing materials in your viewing area.
-
Position lamps or light sources behind your seating area instead of near the screen.
If your room has limited light control, consider using an ambient light-rejecting (ALR) screen to maintain brightness and color accuracy. Proper lighting management can instantly improve picture quality without changing any projector settings.
Mistake 4: Not Centering the Projector with the Screen
When the projector is off-center, it creates uneven focus and image distortion. Some people place their projectors at an angle to avoid furniture or obstacles, but this compromises image geometry.
Always make sure your projector is perfectly aligned with the screen’s center horizontally and vertically. Use a laser level or a simple measuring tape to check alignment before securing the mount. Even small misalignments can cause noticeable distortion, especially on larger screens.
Mistake 5: Mounting Without Considering Ventilation
Projectors generate heat during use, and placing them too close to walls, ceilings, or enclosed shelves can cause overheating. Overheating not only reduces performance but also shortens the projector’s lifespan.
Make sure your projector has enough ventilation space around it. Leave at least 6 to 12 inches of clearance on all sides and avoid blocking the exhaust vents. If your setup involves ceiling mounting, ensure there is adequate airflow around the unit. Some users also install quiet cooling fans or ventilation systems for heavy-duty home theater setups.
Mistake 6: Relying Too Much on Digital Adjustments
Many projectors today come with features like keystone correction, zoom, and lens shift to help fine-tune the image. While these tools are helpful, overusing them can compromise the final picture.
Digital keystone correction, for example, manipulates the image digitally, which may reduce resolution and sharpness. Instead of relying on these settings, focus on precise physical placement. Use adjustable mounts that allow you to fine-tune the position manually without distorting the image through software.
Mistake 7: Ignoring Screen Size and Viewing Distance
Choosing a screen size that does not match your room dimensions or seating distance is another mistake that can hurt image quality. A screen that is too large for your room forces the projector to operate at its limit, resulting in lower brightness.
The ideal viewing distance is typically 1.5 to 2.5 times the screen’s diagonal size. For example, if you have a 100-inch screen, your seating should be about 10 to 12 feet away. Balancing screen size, throw distance, and seating position creates a comfortable and cinematic experience without visual strain.
Mistake 8: Overlooking Cable Management and Power Supply
A tangle of cables not only looks messy but can also lead to performance issues. Loose HDMI or power connections can cause flickering, lag, or signal loss. Some people also make the mistake of stretching cables too tightly across the room, which can damage ports or connectors.
Plan your cable routes in advance. Use cable covers, conduits, or in-wall wiring for a cleaner look. Ensure your power supply is stable and that you use surge protectors to safeguard your projector against voltage fluctuations.
Mistake 9: Not Testing Before Final Installation
A surprising number of users mount their projectors permanently without testing the image first. This can lead to repeated adjustments or even damage during reinstallation.
Before drilling holes or attaching mounts, project the image onto your screen and experiment with different positions. Once you find the ideal distance, height, and alignment, mark those measurements before finalizing the installation.
Mistake 10: Forgetting Audio and Viewing Angles
While focusing on visuals, many overlook the role of audio and seating position. If your projector’s speakers are behind the seating area, the sound will not feel immersive. Similarly, if seats are positioned too close or off to the side, image quality can suffer due to viewing angle limitations.
Try to place your projector and speakers in a way that aligns with your seating area. For best results, use external speakers or a soundbar to enhance your audio experience.
Final Thoughts
Setting up a projector may seem simple, but small mistakes can drastically affect image quality. By avoiding these common Projector Placement Mistakes, you can ensure your home theater delivers bright, sharp, and perfectly aligned visuals every time you press play.
XTEN-AV recommends taking the time to plan your layout, measure accurately, and test before finalizing your setup. Proper placement ensures you get the most out of your equipment and transforms your room into a professional-grade cinema.
When done right, your projector will not just display a movie—it will create an immersive experience that draws you in, frame after frame.
Read more: https://avsyncstudio.wordpress.com/2025/10/07/10-common-projector-placement-mistakes-to-avoid/
